Manage Disk Quota Step by Step
Enable Quota
1 | % cat /etc/fstab |
Looking at the last line of /etc/fstab above, both usrquota and grpquota are added in option domain.
Any changes made in /etc/fstab file will not apply until next time system reboots. This is also applies on the disk quota options which we have recently added in this file. We have two choices here; either restart the system or remount the associated partition. Wherever possible we should always choose the first option. But in several situations immediate restart is not possible. In that case we can use second option.
| Domain | Filed | Description |
|---|---|---|
| UUID=”” | What to mount | Device which we want to mount. We can use device name, UUID and label in this filed to represent the device. |
| /p/w | Where to mount | The directory in main Linux File System where we want to mount the device. |
| xfs | File system | File system type of device. |
| defaults,usrquota,grpquota | Options | Mount options which control the mount process. To enable user quota add usrquota option and to enable group quota add grpquota option. |
| 0 | Dump support | To enable the dump on this device use 1. Use 0 to disable the dump. |
| 0 | Automatic check | Whether this device should be checked while mounting or not. To disable use 0, to enable use 1 (for root partition) or 2 (for all partitions except root partition). |
Remount File System
1 | % sudo mount -o remount /p/w |
Create Quota File
1 | % sudo quotacheck -cug /p/w |
This command will create necessary files for quota. Let’s understand this command in detail.
quotacheck : This command is used to check the quota implementation in partition.
-c : This option is used to create the quota files in specified partition.
-u : This option is used to check the user quota.
-g : This option is used to check the group quota.
Basically this command will check quota entries in specified partition. If aquota.user and aquota.group files are not available in specified partition, it will create them.
We need to run above command only once for each partition where we want to configure the disk quota. Once necessary files are created, following command is used to sync the disk quota database table with current disk usages.
1 | % sudo quotacheck -avug |
-a : This option is used to check all quota enabled partitions.
-v : This option is used to print real time updates as command proceeds.
-u : This option is used to check user disk quota information.
-g : This option is used to check group disk quota information.
aquota.user and aquota.group files are used to store quota configuration values for user and group respectively. Quota database keeps track of disk usage. How much space is allowed to a particular user is configured in aquota.user file while how much space has been used by that user is tracked in quota database table. The aquota.user and aquota.group both are binary files which mean we cannot read or write them directly.
Configure Quota Policies
To configure quota policies, we have to define three values; soft limit, hard limit and grace period.
Soft limit: - This limit is flexible. User or group is allowed to cross this limit temporary.
Hard limit: - This is fixed limit. User or group is not allowed to cross this limit.
Grace period: - This is the time period in which user or group is allowed to use additional space beyond the soft limit.
To understand quota policies practically, let’s create some dummy requirements.
| User /Group | Block Size Soft Limit | Block Size Hard Limit | Grace period | Inode Soft Limit | Inode Hard limit | Grace period |
|---|---|---|---|---|---|---|
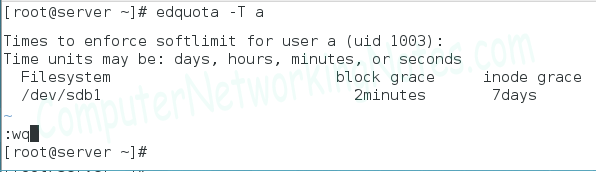
| a | 100Mb | 200Mb | 2 Minutes | 10 | 10 | Nil |
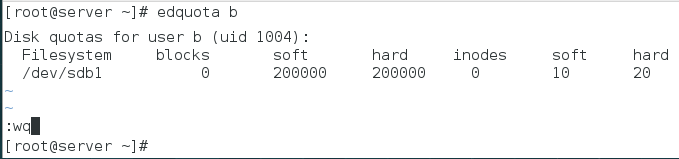
| b | 200Mb | 200Mb | Nil | 10 | 20 | 5 hours |
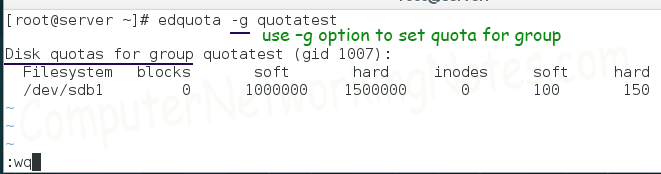
| quotatest | 1000Mb | 1500Mb | 1 Day | 100 | 150 | 5 days |
Nil: - If both soft limit and hard limit are same, there is no need to configure this value.
Configure Limit for User and Group
1 | % sudo edquota -a |
Above command will open user quota configuration file.

This file has seven columns
| Column | Name | Description |
|---|---|---|
| 1 | Filesystem | Partition where this quota will apply |
| 2 | blocks | Number of blocks currently used by this user |
| 3 | soft | Soft block size limit for user |
| 4 | hard | Hard block size limit for user |
| 5 | inodes | Number of inodes currently used by this user |
| 6 | soft | Soft inodes limit for user |
| 7 | hard | hard inodes limit for user |
Let’s update this file
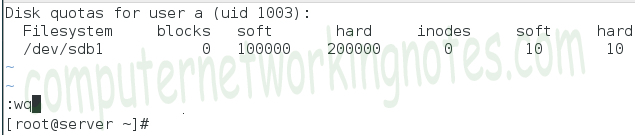
Default block size is 1Kb. (1block = 1Kb).
Configure the quota limit for user b
Group quota is also defined in same manner. By default edquota command is used to set quota for users. To set quota for group we have to use –g option with this command. Let’s define group quota for group quotatest.
Configure Grace Period
By default grace period is set to seven days. It means user or group will be able to use resources (block size or inodes after soft limit) till seven days. After seven days they will be denied to use any additional resources. We can adjust grace period as per our requirement.
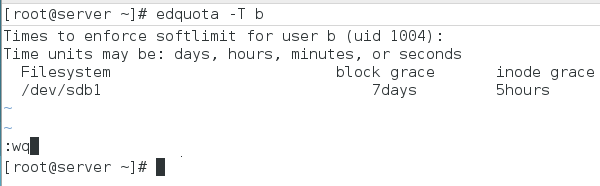
Let’s configure grace period for user a and user b.
Configure grace period for group quotatest.
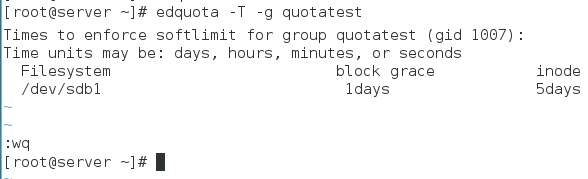
Never put space between value and unit for example “5 days” will be wrong entry, correct entry will be “5days”. A space between value and unit or undefined value will generate edquota cannot read individual grace time from file error message.
Finally enable quota with following command.
quotaon /p/w
Test Disk Quota
To verify disk quota setup, we can use following commands.
| Command | Description |
|---|---|
| quota [user name] | To view quota uses by user |
| quota –g [group name] | To view quota uses by group |
| repquota –a | To view quota uses by all users and groups |
Summary: important commands for quota management
| Command | Description |
|---|---|
| quotacheck | This command is used to check quota implementation and update quota database from file system. This command is also used to create aquota.user and aquota.group files, if they are not created manually. |
| edquota | This command is used to configure quota values for user and group. |
| quota | This command is used to view the quota uses for specific user or group. |
| repquota | This command is used to view the quota uses for all users and group. |
| quotaoff | This command is used to turnoff quota temporary. |
| quotaon | This command is used to enable quota again if it is disabled. |